Shoe care is important no matter the time of year. Water is, and always will be, bad for good quality leather, particularly good quality calf leather uppers and soles. This blog will focus on calf leather as opposed to polished or suede. For suede leather care, please see this link for our previous blog. (PS scroll down to find your exclusive 15% shoe care discount).
You will need: (Click here to see all below items on our website).
- One or two cloths/rags. I like an old cotton t-shirt, but whatever you have lying around, just make sure there’s no loose dirt on there.
- A horse hair brush. I prefer a medium sized one.
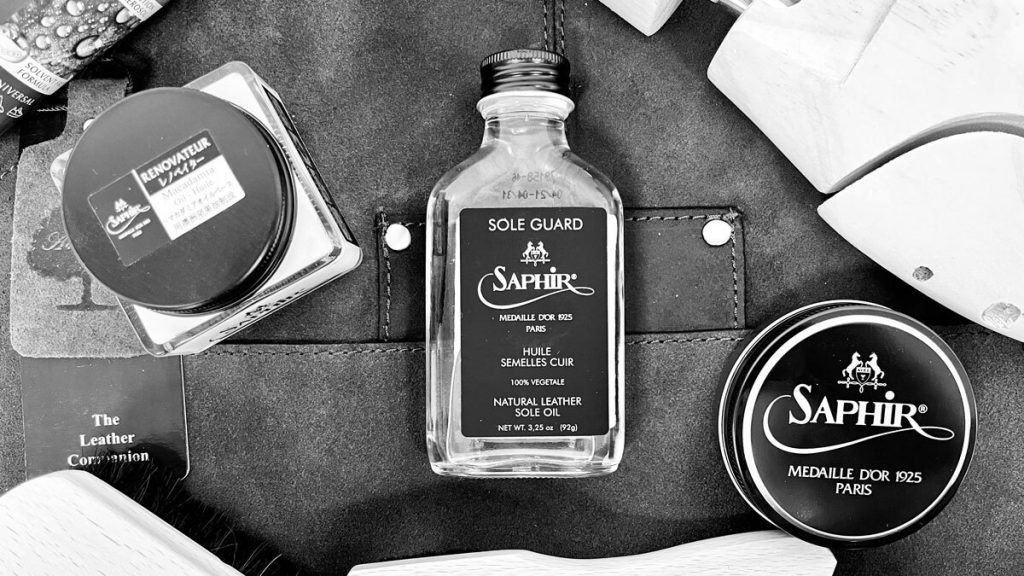
- A good quality cream. I wouldn’t worry if you can’t find an exact colour match. If in doubt, get a slightly lighter shade, never darker. We use Saphir 1925.
- A good quality polish. Again, don’t worry if you are unable to find an exact colour match, get as close as you can or a slightly lighter shade. We use Saphir Pate De Luxe.
- Saphir Renovateur Macadamia.
- Saphir natural leather sole oil.
- Shoe trees…ideally wooden.
- A welt brush. If you don’t have one an old toothbrush or something that will help you get product in between the uppers and the welt.
- An apron is recommended but not essential. It will protect the clothes you’re wearing from product spill and let’s be honest, it makes you look like a pro!
- Dasco Protector spray. This will add that final bit of protection.
Your shoes deserve the best quality products and we appreciate this is not cheap, but bear in mind it will last you many years and keep your shoes looking their best! With this in mind we have created a special code for you to use on full priced shoe care products to save you 15%. Just use the code SHOECARE23 in the basket when placing your order. As above, this link will take you to a pre-populated basket including the above items (make sure you change the shoe trees size to what you need and amend the shoe cream and polish colour to suit), just don’t forget to use your code!
Let’s get down to business:
Step one
Get that apron on! You want a nice clean base to work off, so you need to remove all dirt off your shoes, including your soles. Make sure your shoes are dry and take out the laces, then insert your shoe trees to give your shoes some shape and push out any creases. Now grab your brush and take off as much dirt as you can (you may want to do this outside or over a sink). If you need to use a damp cloth then you can, just be sure not to soak the shoes and allow them to dry before moving on to the next step. Get the dirt off your brush ready for later. It should come off easily using your hand to brush against.
Step two
It’s time for some renovateur. I personally use my finger for this step but you can use a cloth if you prefer. You want to apply a thin even coat over the uppers, welt, and heel, basically everywhere apart from the sole. This product goes a long way, so you only need a very small amount. If you notice some colour coming off then this means you have a build up of old polish and it’s good to get this off so just wipe off the excess with a cloth. Leave them to rest for five minutes and then use the brush at a moderate speed, back and forth, to remove any excess. This will leave your leather nicely nourished and ready for the next steps.
Step three
Now we apply our cream. I would use a cloth for this as the cream can stain your fingers. As above, you want to apply a thin layer of cream over the shoes, but avoid the welt and sole (if the colour matches your heel stack and welt then you can use it there too, usually this is a dark brown). Pay particular attention to the toe and work in small circles just to rub it in nicely, this is the part where your scuffs and scratches will get covered up. Get your welt brush and make sure you get the cream in the areas around the stitching where the welt meets the uppers. This is where water is going to soak in through the shoes and the cream is going to help repell it. Leave the cream on for two to three minutes and buff off with your brush. Spend a little longer on the brushing here and you will notice a wonderful sheen already. Your leather now has its first layer of protection while covering up those little marks.
Step four
Possibly the most satisfying part…applying the shoe polish. Make sure your shoes are fully dry from the previous steps. Use a cloth and two fingers to get a small amount of polish from the tin. Start at the toes using small circles and even spread it until it dries, then get a little more and do this around the whole of the uppers, taking time to use small circles and don’t forget to use your welt brush for the stitching and welting area. If you want a bit more of a shine, you can use drops of water to create a bull shine as per this video our MD Jason made (well worth a watch). Once you have applied the polish you only need to wait two to three minutes. Don’t wait too long as the polish can be hard to buff off. Get your trusty brush and brush fairly quickly with a little force to create some friction. This helps to set the polish and will create a noticeable shine. Be careful not to catch the end of the brush on the shoes when doing this. It’s easily done if you get distracted and you will be cursing yourself. This is your second layer of protection. If your shoes could talk, they would be thanking you (or walking you to the pub….)
Step five (skip this stage if your shoes have a rubber or crepe sole)
Without doubt the largest factor in soles wearing out quickly is moisture. When you think about it, walking on wet concrete is almost like sandpaper on your lovely leather soles and if you do this repeatedly, they are going to wear down extremely fast, no matter the quality. You can’t always avoid wet weather, of course, and by making sure you rotate your shoes and let them rest and dry with good quality wooden shoe trees (and following our care advice in this blog), you will be prolonging the need for a resole two-fold, so it’s worth having at least one other pair to wear during the week and alternating between them both.
Back to business. The good news is they are nearly ready, you just need to seal that leather sole. Apply the sole protector with a cloth. Your sole will likely soak quite a bit up, so don’t go crazy, but apply enough that you can see it has evenly soaked up. Leave them to dry for at least one hour before wearing them out.
By now your shoes are looking a million dollars. It’s satisfying right?
Step six
This is optional, but one final layer of protection will help. We are using a colourless protector spray, this is going to really seal in what we have done above. A light, even spray over the uppers and a brush to get the excess off is all you need, but check the bottle for further instructions if you aren’t using Dasco Protector spray and just make sure it is suitable for leather shoes.
Congrats on a job well done!
Please feel free to ask us any questions at all about shoe care, we are always at hand of help you get the most out of your shoes.
No Comments